In recent newsletters we have discussed energy audits and ventilation and their relationship to maintaining comfort and good indoor air quality. The next step is to weatherize your home, which can help address air infiltration – the “bad” ventilation – while helping our homes fight the elements and last longer.
Buildings rely on many different materials to resist the sun, rain and wind. These materials are prone to shrinking or swelling, warping, cracking, and wearing down, so it’s very important to inspect the exterior of our homes twice a year and know what each area should look like. (see Green Living tip below) If you see caulking pulling out of a crack it’s obvious that repair is needed, but if you see gaps under a window or near the bottom of a masonry wall they might be there to properly drain the wall. You’ll have to know the difference!
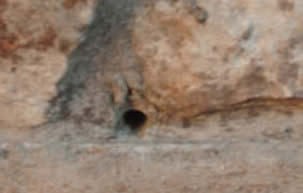
In this photo, this little hole almost looks like it was made by a insect, but it was made by a mason for the purspose of letting condensation drip out from the back of the masonry. So don’t seal it!
Last month, we invited our readers to view an energy audit on a 30 year old Southwest Austin home. We had a great audience and the results were fascinating! The thermal imaging scan was so graphic, you could literally see streaks of heat where hot air was moving through the roof rafters at the vaulted ceiling. Isn’t this a fantastic photo!!!
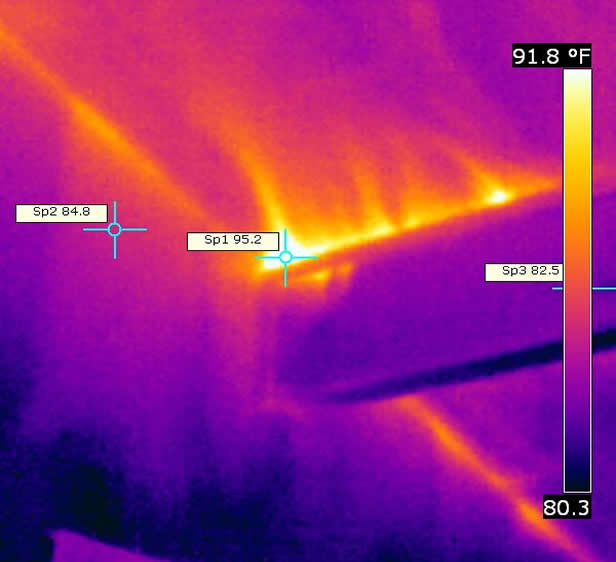
The depressurization test, also known as blower door test, found major sources of air infiltration, including an unused vent in the slab that was pulling in moldy outdoor air from the soil in a flower garden, and air leaking through interior walls that was coming directly from the dusty attic. The reaction of those in the house during the test was immediate – that air was hard to breathe! It must be remembered though, that this “bad” air is always entering the house in small doses, so while the effects aren’t as dramatic as they were during the depressurization test, they are always there in small amounts! If you have an energy audit conducted, your more detailed knowledge of your home can even assist the auditor in tracking the sources of leaks. Thanks goes to BMC’s Energy Auditors, who performed the energy audit and entertained and amazed our guests.
Once you have found leaking areas it’s time to seal them up. Visit Building Performance International – BPI and find a certified weatherization expert in your area. Or if you like to “DIY”, you can pick up a caulk gun and spray foam and tackle it yourself.
Small cracks can be handled with sealant or caulking from a tube. Look for a product that has silicone in it and is paintable if necessary. Areas with metal to wood or metal to cement connections will generally best be sealed by a 100% silicone product. Ideally the crack is accessible from both sides and is wide enough to get a bead of caulk positioned between the two materials being sealed so that there is a cushion of caulk to move with the materials. More likely, however, is that only one side can be sealed and it’s an irregular shaped crack that the caulk can’t be pushed into. That’s OK, seal it anyway and check it each time you re-inspect the house. Cracks in some materials can be scraped to be a little wider so the caulk can be pushed in – that little bit of extra “surgery” will help the seal last longer.
Larger cracks and holes require something that can expand. Spray foam is ideal, but keep in mind there are two types. Minimally expanding foam is best around windows and doors. If you find that the jamb is leaking and put in standard polyurethane foam you can cause the frame around the opening to warp, interfering with the operation of the door or window. You can also seal other holes with the minimal expanding foam without as much worry of putting too much in. If you put too much standard foam it will come billowing back out of the opening over the next hour, making a sticky mess! Whichever type of foam you use, if it is exposed to light it will deteriorate, so apply caulk or latex paint over it to protect it.
When sealing up the house, prioritize your leaks, and hit the biggest first. Sealing the easiest 20% of your leaks will solve about 80% of your air infiltration problems. The harder to find leaks will take some time.
There are also products available to help in areas that might otherwise be difficult to seal. Electrical boxes are often not sealed, but are a major source for leaks. While you could ideally remove the cover (with the power off) and seal up around the outside of the box and the holes where the wire enters, there are products that stop most of the airflow with just a gasket and outlet caps. Maybe you do the gasket and caps one year, and then next invest the time to fix the back side of the outlets more permanently. Sealing should be an ongoing process.
Depressurization tests sometimes show that the outside walls are less leaky than interior walls – the air finds it’s way in through the attic or a crawl space and gets to the interior where sealing was not considered important, so once you think you have the outside walls sealed be sure to focus your attention on the interior walls! It may be possible to seal the walls from above in the attic, but if not, treat the interior openings such as doors, plumbing penetrations and electrical boxes as if they were on the exterior.
Now that you have sealed up your home – remember to repeat the process regularly. Materials will always keep moving around and changes to your home over time will create new paths for air to get in. If you are having major remodeling work done, consider testing the whole home with a blower door test to identify areas that might have been impossible to seal in the past but can now be accessed or where access could be gained with a little extra work. One example of this is having a trim carpenter remove and re-install it for a reasonable extra fee. You may find that the house uses less energy to heat and cool after the remodel, even when adding space.
In coming months, please watch for more information continuing this path of understanding building science. We will cover insulation, mechanical systems, thermal bridging and more in this series called Building Performance with Intention.
Come join us…
And see what’s Green in the Hill Country!
Custom Design Services is excited to be an exhibitor at the Fredericksburg Renewable Energy Roundup next weekend, September 24 – 26th.
We will also be an exhibitor at the Dripping Springs Rainwater Revival on Saturday, October 9th.
Green Living Tips!
We welcome inspirations from your home to put into future newsletters. Email them to me; Cammi Klier. Thanks!!
Do-It-Yourself Weatherization Inspection
Regular inspection of your home’s exterior will help you quickly identify unusual conditions that can lead to greater damage over time. Here’s a quick, basic inspection routine you can use a couple times a year to make sure you get the most life out of your home’s exterior materials.
The Inspection should start with checking the roof – either from a ladder or from the ground with a pair of binoculars. Observe the vent stacks and boots that seal where they go through the roof, looking for torn or bent material (such as where a tree branch may have fallen) Look for stains on the sides of fireplace flues or adjoining walls where the flashing may have leaked, and check that the flashings are properly lapped over each other from top to bottom – just like shingles. Remember that flashing materials are designed to shed and drain water so don’t be tempted to seal the bottom edges of the overhanging pieces.
Next, make sure that the drip edges along the edge of the roof are crisp and straight. Gutters should be clean and straight with no evidence of pooling water inside. Why are these items important? Water that never hits the wall below is much easier to keep out.
Next verify that the soffit vents (if present) are clear for easy air movement. Blocked soffit vents can contribute to the buildup of negative pressure in the attic, making air infiltration in the rest of the home more likely. Observe any caulked joints to make sure they are completely sealed, and check again that no water has leaked from the roof deck into the soffit area – signifying a leak somewhere further up the roof that hasn’t showed up inside the house.
Now look at the walls – again checking that all caulked areas are completely sealed and have not shrunk, cracked, peeled, or pulled away. Any place where one material meets a different material (such as a metal dryer vent on wood siding) is a likely failure point for caulking. Check the condition of the paint too. Any loose or chipping paint must be removed, the material below it re-primed, and re-painted before caulking as the caulk will not seal effectively if it’s applied to raw wood.
Now to the most important part – window sealing. Check that the materials around the window have not shifted. Check that the glass is properly sealed into the frame and that any glazing putty (rare these days) or rubber weatherstripping is not dried out and cracked. From the inside, check that all windows and doors are properly opening and closing in their frames and making good contact with the weatherstripping around them. Windows should be checked frequently throughout the year on their own because they may be opened during good weather then improperly closed and forgotten during the long cooling season, potentially adding unintended air infiltration for months at a time.
All joints should be typically be sealed with some exceptions – the bottom of the window sill and trim will sometimes have gaps near the sides of the windows. These are weep holes to allow water out, and should not be sealed. The same is true on the bottom of the window unit itself. There are slots or holes along the frame to allow water that gets in the frame to escape. Do not seal these up, they are designed many window frames. You will also most likely find holes or slots in masonry walls near the bottom and over openings. Sometimes they’re filled with rope, and they’re also called “weeps”. They are there to shed the water that has penetrated the wall further up because a hard rain with wind can actually drive water right through the mortar. Make sure these openings are clean and clear, other than rope or screen which is usually part of the drainage system.
Finally, inspect the foundation for signs of staining, splashing, or insects. The area immediately adjacent to the foundation should be clear for a foot or two to allow air to circulate to help dry the siding after rain occurs, and the ground should slope down away from the house for at least 10′ or as far as possible if on a small lot.
By inspecting the exterior of the home a couple times a year the homeowner can identify problems quickly and easily.
Thanks for reading today! Please watch for more on maintaining your home in a coming newsletter on maintenance manuals for new and remodeled homes. If a new car comes with a manual, shouldn’t your home as well?