Designing a Home That Evolves With You

A home should never feel static. As families grow, lifestyles shift, and needs change, thoughtful design allows your home to evolve without losing its character. That’s where professional residential design makes a meaningful difference.

CDS Home Design specializes in full and partial home remodel and renovation design, helping homeowners reimagine their spaces—whether that means updating a kitchen, redesigning a bathroom, or transforming an entire home interior. Every project begins with understanding how you live day to day. From traffic flow and storage to natural light and long-term functionality, each design decision is intentional and personal.

When more space is needed, home additions provide an opportunity to expand without leaving a beloved neighborhood. CDS designs additions that blend seamlessly with existing architecture, whether expanding outward, adding a new primary suite, or designing a full second-story addition. The goal is always cohesion—new spaces should feel as though they were part of the original home design.

Outdoor spaces are also an essential extension of modern living. With outdoor living design, CDS creates covered patios, open gathering spaces, outdoor kitchens, casitas, and backyard retreats that support entertaining and relaxation year-round. These spaces are carefully planned to connect visually and functionally with the interior of the home.

For homeowners starting from scratch, CDS offers new construction design for everything from ADUs and single-family homes to expansive luxury residences. Each project balances aesthetics, livability, and buildability—ensuring the design is as practical as it is beautiful.

Throughout every phase, CDS provides permit consultation and professional coordination with builders, engineers, interior designers, and subcontractors. This collaborative approach keeps projects moving efficiently and helps prevent costly surprises.

Ultimately, good design isn’t just about how a home looks—it’s about how it supports your life now and into the future. With our experienced planning and thoughtful execution, your home can grow right alongside you.


#HomeDesign, #Remodeling, #HomeAddition, #OutdoorLiving

Construction Tip for the Homeowner

During construction after the mechanical and electrical inspections, take photos of the interior walls and ceilings of your home from every room. This needs to be done before the insulation is installed. Label these so you know later what room, wall or ceiling it is. This will provide valuable maintenance information for professionals that may need to come into your home to repair or update anything from plumbing or electrical to structural problems. This can also be helpful with finding studs when hanging pictures or ceiling fixtures.

How do I design a home that I can afford?

Costs of construction and materials are on the rise, so the biggest return on your money is to be conscious of the size of your home. The design of your home is crucial to this. Ask yourself “How do I really live?” and “What do I need in my home and what do I want?” In many cases you may find that some of your wants can combine with some of your needs. In stead of having formal and informal dining areas, you may create an open kitchen — dining area that suites your entertaining needs. Or you may desire to have a library and a home office. A creative design may work this into a hall way with a row of bookshelves on one side and a hideaway office nook on the other. These kinds of space saving solutions will save you far more money than your choice of materials. With a quality design team, you can have a beautiful, spacious, square footage conscious home that doesn’t break the bank!

Construction Material Recycling

During the construction phase of your new home or remodeling project, it is a good idea to have 2 large trash bins erected. One of the bins will be for trash items, while the other is for materials that can be re-used. Before the project begins, discuss with your builder that you intend on re-using or recycling materials to either go back into your project, to Habitat for Humanity or other job sites. Recycling materials helps keep the cost of your building materials down, provides usable materials for others and reduces the cost of waste removal and dumping fees. Hiring a builder that believes in this philosophy will help your cause tremendously.

What is Linoleum Flooring?

Many people hear that word as a “catch-all” term for any synthetic flooring. Not true! It is a natural product invented in 1860 and is made of linseed oil, pigments, pine rosin and pine flour. Linoleum was later replaced in popularity by vinyl floor coverings of the 1960s, but is regaining popularity today as an affordable natural alternative to vinyl… There are a great many styles and colors to choose from including wood grain and slate.

Installation should include a 0-VOC adhesive by Forbo called L910. This adhesive takes several days to cure so be sure that water does not seep in at the edges, your Linoleum will bubble and will have to be re-installed. To help prevent that from happening, a 0-VOC caulk should be placed at the perimeter seems at the time of installation.

How to make the most of available Green building technology

There are so many systems, material and ideas that it can become overwhelming. The most important Green building concept is to build a home suited for your land. The second most important thing to do is to visit the Green Building Program website often and become familiar with terminology and concepts. This will allow you to ask the right questions and suggest what is most interesting to you during the design process.

How to get the most out of your Home Designer?

What you desire for your new home, is an understanding of how you like to live, what your real needs are and how those needs can fit into your budget. Make a wish list of all the visions you might have for your new home and try to include pictures. The more specific you are the more likely your home will meet your needs.

Keep your Water

For decades, the construction industry has had one main way of dealing with drainage; drain the water to the street. And for decades, storm drains have sent water to our local creeks and rivers downstream to the next city who then treats that water and distributes it to the community.

In the last 15-20 years the country has undergone a large amount of construction and growth in cities, suburban and rural areas creating less free ground to absorb rain water into ground water and aquifers. In recent years we have experienced a much higher demand for water in residential areas in spite of watering restrictions, conservation education and large corporations creativity in using less water. And with this demand, it is increasingly more expensive to treat water for our use.

We have also noticed a change in weather patterns. An article from Environment Florida, a report on the rising frequency of extreme precipitation states, “In 1999, researchers at the Illinois State Water Survey and the National Climatic Data Center (NCDC) found that storms with extreme precipitation became more frequent by about 3 percent per decade from 1931 to 1996.” This means that the amount of rain may still be about the same but in patterns of longer drought times and larger more intense rain fall.

Another article from the United States Department of Agriculture states, “In the Texas Blackland Prairie, an important agricultural region with a large and increasing urban population, drought and excess rainfall can be experienced throughout the year.”

With heavier periods of intense rain surrounded by longer droughts, storm water has less of an opportunity to soak into the ground which creates an even bigger strain on the already taxed storm water drainage and local stream systems.

For these reasons, it makes sense to rethink our approach to handling storm water through methods of passive collection and absorption to keep your water on site.

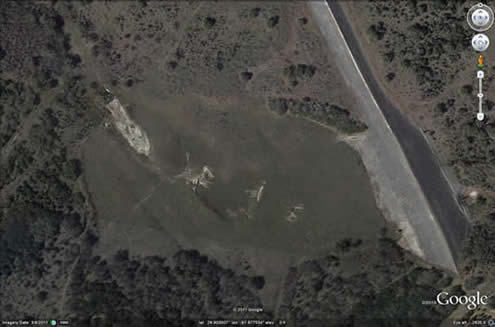
A large scale example is in Hays county. In the 1980’s, flood control dams were built to protect cities like San Marcos from flood waters and to control storm waters. Click on the link to read more about the dams and thier locations. With out these dams, flood water would quickly find its way to the Gulf of Mexico causing considerable damage in San Marcos and other areas downstream and potentially loss of life. Freeman ranch, part of the Texas State University property, is home to one of these dams and a direct sink into the Edward’s Aquifer. Here is a Google image of the dam and sink..

West of the dam you can see the area where water has settled and the depression in the center which is the sink. My husband, John Klier, is a PhD student at TSU studying geographical remote sensing had the unique opportunity to spend a year collecting data at Freeman Ranch. He says that during heavy storms and rain fall, water fills behind the dam. The ranchers at Freeman report that they have observed the water swirling into the sink as it drains into the aquifer. What a sight that would be!! On a residential scale, this is exactly what we need to be doing with our storm water.

Dam

This concept is foreign to our way of thinking. Builders will be cautious in slowing drainage because they would fear issues associated with standing water for long periods of time. But this is not the case. Berms, swales and depressions will slow water run off so that there is more time for water to soak into the ground. One solution for this is a rain garden.

Chris Maxwell-Gaines of Innovative Water Solutions shared his knowledge with me on the subject. Chris says, “A rain garden is a depression created in a lower part of your property with an augmented soil mix and a palate of plants that can tolerate somewhat boggy conditions.” The soil mixture is compost and sand which will allow the water to drain into the ground quickly. A depth of only 6-12” will also help the water drain quickly. “It’s basically a depression with plants.”

Rain gardens in a residential setting can be large or small and typically located in a place that can tolerate being wet. With our soil conditions, we would likely not see water standing for more than a ½ a day unless there is a heavy amount of clay. If this is the case, the soil can be modified.

In some cases where a detention pond is required, a permanent rain garden can be created in place of the detention pond. This is a more natural and low impact way to develop proper drainage and absorption. In the case of drought conditions like we are seeing now, this rain garden would legally have to be maintained so that the plants would not die.

Moving rain water on a site has many times been done with french drains or an inlet that flows into a pipe. Because the pipes can be clogged, it is better not to depend on this method but rather to let the water flow naturally over the surface of the land soaking into the ground is it flows. Low impact development is a better solution.

If it seems a little odd to discuss a topic like rain water when we currently have none, it is so that we can be more mindful when we do have some. Pray for Rain!!

Chris also is very excited about his new blog about water catchment and related water issues. In this time of drought, Chris will be a good resource on how to take good care of the water we have. Read his blog here. www.watercache.com/blog. Visit the Innovative Water Solutions website and contact Chris at 512-490-0932.

try a leaf lawn!

Leaf Lawn

This leaf lawn is in my own back yard and the result of delaying our plans to plant a Zoysia lawn until the drought is over. It is quite nice to walk on bare foot and has an earthy, natural look. Installation involved raking the dirt level and laying about a 3” layer of partially decomposed leaves. About each 3 months a fresh layer of leaves should be added over the old. No watering necessary!

Helpful factoids about Mercury and CFL’s

Here are some helpful factoids about Mercury and CFL’s (compact fluorescent lamps)

– Coal-fired power plants are the largest man-made source of mercury because mercury that naturally exists in coal is released into the air when coal is burned to make electricity. Coalfired power generation accounts for 51 percent of the mercury emissions in the U.S.
– The amount of mercury in mercury-based thermometers, 0.5 to 3 grams, is 100 – 600 times as much as a common CFL, about 5 milligrams.
– If the electricity used to operate your lamps is generated from coal, and you operate 100-watt incandescent lamps for 10,000 hours, the power generating plant will release between 40 mg and 70 mg of mercury into the environment, depending upon the type of coal being used. If instead of the 100-watt incandescent lamp, you use a 25-watt CFL, the power plant mercury emissions drop to between 10 and 18 mg over the same 10,000 hour period, again depending upon the type of coal used.
– The use of CFLs reduces power demand, which helps reduce mercury emissions from power plants.

Sources for these factoids from:
Mercury and the Environment – Sources of Mercury – Mercury Containing Products
For more information on all sources of mercury.
For more information about compact fluorescent bulbs.

Thank you for reading!! If you noticed a long gap between our newsletters recently, it is because we have been busy with our clients! This is good news because the economy is recovering and we are please to serve more Central Texas families and homeowners in designing their homes. THANK YOU!!

Manual J for a Proper Fit

When building or remodeling a home, the mechanical system will play a big role in it’s overall comfort and energy efficiency. No matter what the type of heating and cooling system you choose to install, installing correctly sized equipment is critical. The way to determine the correct equipment heating and cooling capacity is by using a Manual J Load Calculation, then use Manual S to select the correct equipment and Manual D to lay out the ductwork.

The Air Conditioning Contractors of America (ACCA) created the Manual J Load Calculation to allow mechanical contractors to accurately calculate the size equipment needed to heat and cool a given home. The completed calculation is essentially an energy model for your home that uses window sizes, insulation values, orientation, and construction type to tell you how much thermal energy is gained or lost during the hottest and coldest outside temperatures your home will commonly encounter.

In years past, many contractors and mechanical installers would often guess or use a “multi-finger method” to figure how much capacity to install. The multi-finger method was to stand at the curb, hold up 3 or 4 fingers at an arms distance. If 3 fingers covered the house, a 3 ton unit was ordered and if 4 fingers covered the house, a 4 ton was ordered. Yes, this really happened! The sloppy habits have persisted through the years because they didn’t want to do the homework involved in filling out paper forms, looking at tables and performing calculations. They would also often “super-size” a system in order to make certain that the system was big enough to guarantee the power to heat and cool to the clients comfort even during extreme conditions that might happen every decade or so. The problem with a system that’s oversized is that it will not properly control humidity and the inside of the house can seem stuffy or muggy even though the temperature is where the thermostat has been set. Short operating cycles also wear the equipment out prematurely.

Manual J Load Calculations are now completed with computer software that automates most of the tedious parts, similar to the way that tax software has streamlined filing tax returns. Like filing a tax return, as of last October a Manual J calculation is now required in Texas for any new HVAC installation. This is a huge step in the right direction and helps to eliminate the multi-finger method or guessing. A mechanical installer will do the manual J calculation for you, however it would be prudent to understand what goes into the calculation for yourself. The report is only as good as the data that has been entered. Your designer or architect can be a good resource for double checking that the orientation, window, door and wall sizes and other parameters of the home have been properly interpreted from the blueprints.

Once the Load Calculation has been completed, it’s time to choose the heating and cooling equipment, and size the ductwork to distribute the air around the house properly. This is where the load calculation can often get “inflated” since most equipment is in sizes such as 1 ½ Ton, 2 Ton, 2 ½ Ton, 3 Ton, 3 ½ Ton, 4 Ton, 5 Ton. As you might guess, there is an ACCA Manual for these activities too: Manual S will help your mechanical contractor choose the proper equipment combination to meet the Manual J results, and Manual D will help with the design of the distribution system (ductwork) for your system so the proper amount of air is put into the right locations of the house. Custom Design Services offers third party Manual J calculations as an additional service.

When you install a new mechanical system be sure to ask for a copy of the Manual J and other reports involved in sizing your equipment. Ask your designer or architect to review this with you and go over the “house facts” to make sure the data in the reports is correct. You will be glad you did when you feel the comfort of your home and of your electricity bill.